# Basic Docking Topics
Docking is a way of placing two components in defined places next to each other. It is the second method of combining components together in one configuration. While a subComponent results in what behaves as a single component in the configurator, if you combine two components via docking, you have two distinct components with their own set of parameters. The docking hierarchy is a tree, parent-child structure. One parent can have more children. Each child can be a parent to further children. Every child can only have one parent and there is always one component, which does not have a parent, which we refer to as the root component of the configuration.
Docking is defined with a pair of docking points, one parentDocking point and one childDocking point (we have also docking ranges, line and line ranges at the parent side, which will be a topic of further chapters). A docking point has position, rotation, condition and assignments. If there are two docking points in one place, a connection is instantiated.
If you click the Add-On button in the configurator, you see a list of possibleChildren. If you click a possibleChild, previews are shown in all places, where all current components' parent dockings match with the child dockings of the selected possibleChild. A matching docking point pair means, that the masks are of the same name, both conditions are evaluated to true and the parent and child docking points are in one place, with their directions matching. After you click one of the previews, the component behind the possibleChild is instantiated, added to the configuration and a connection is created.
# Minimum Docking Example
Let's try to show a minimum example of dockings. You need geometry (so that you can select the individual components), a pair of docking points and a possible child definition.
Important: The possibleChild must lead to an existing itemId or componentId in the database, therefore we use isdt:test1 as the componentId.
Load following code into kernel:
{
    "id": "isdt:test1",
    "geometry": "AddCube(Vector3f{1000, 1000, 1000}); SetObjSurface('isdt:cyan');",
    "parentDockings": {
        "points": [
            {
                "mask": "mask",
                "position": "{1000, 0, 0}"
            }
        ]
    },
    "childDockings": {
        "points": [
            {
                "mask": "mask",
                "position": "{0, 0, 0}"
            }
        ]
    },
    "possibleChildren": [
        {
            "componentId": "isdt:test1"
        }
    ]
}
The Add-On button shows, allowing you to dock further cubes to the right. If you dock one child, and click Interactions - Get Current Config, you will get the configuration json, which you can load in the Configuration field, reloading the configuration.
{
    "children": [
        {
            "children": [],
            "componentId": "isdt:test1",
            "dockChild": "{0.00,0.00,0.00}",
            "dockParent": "[{1000.00,0.00,0.00}]",
            "dockPosition": "{1000.00,0.00,0.00}",
            "parameters": {}
        }
    ],
        "componentId": "isdt:test1",
        "dockChild": "",
        "dockParent": "",
        "dockPosition": "",
        "parameters": {}
}
You see that the configuration stores the position of the docking. This is important to understand - it does not store a docking point id, the docking mask, only the position:
dockParent- The resulting coordinates of the parent docking point, in the parent's coordinate system.dockChild- The resulting coordinates of the child dockign point, in the child's coordinate system.dockPosition- Coordinate of the connected point in the coordinate system of the parent. Will mostly match the dockParent.parameters- The stored parameter values.
Lets try to change the dockPosition and dockParent to {1100,0,0}. The configuration reloads with an offset, which will stay until you re-dock. If we try further, changing to higher values, the configuration reload will fail with an error message:
[Kernel Exception]: isdt:test1 docking to isdt:test1: invalid_docking_expression missing childDocking at{0.00,0.00,0.00} found 1 possible dockings in 1 overall dockings
The configurator tries always to place the child, so that its child docking point is in the dockPosition of the parent's coordinate system, then checks the mask and conditions. If masks match and both conditions are true, the configuration reloads successfully. If a pair is not found at the exact position, the configurator tries to find a matching pair at a distance of 100 mm or less. If it even after that does not find a matching pair, it throws the error and the configuration fails to load.
Important: If you have more complicated docking, where you compute the docking coordinates, you must make sure, that all the computations can be computed from the parameters, otherwise the configuration is prone to fail when reloading.
# Example: Two-Way Docking of Parametrized Shelf
In this example, we take the procedural shelf we already made in this course, and will allow them to be placed next to each other. We will base the work on the previous final state of the shelf system, which you can find here (the version with the part list subcomponents).
- In order to add the docking points, we must first know where we should add them. The pivot of the product is in the rear left corner and the width is stored in the variable of the same name. It is good to place the docking points in some distinctive points of the products, which can be the corners. Our best practice tells us to place them in the rear bottom corners. The pivot is in the rear left bottom corner, therefore we have one parent docking point with the coordinate
{0, 0, 0}with a maskshelfLeft. The other parent docking point will be then in the right bottom corner, which is in{width, 0, 0}and maskshelfRight. If the parent docking point represents a clearly visible connector, like a hole, it should be place at its position.
Therefore, we know, we can add the parent dockings like this:
"parentDockings": {
    "points": [
        {
            "mask": "shelfLeft",
            "position": "{0, 0, 0}",
            "rotation": "{0, 0, 0}",
            "condition": "true"
        },
        {
            "mask": "shelfRight",
            "position": "{width, 0, 0}",
            "rotation": "{0, 0, 0}",
            "condition": "true"
        }
    ]
}
- On the child side, we will have the child docking point
shelfLeftin{width, 0, 0}, which is actually on the right side of the component. The Left/Right words in the docking masks should always be called from the parent's side pespective, as specified in the Naming Convention. TheshelfRightdocking point is then in the position of{0, 0, 0}, which is on the left side. This can be counter-intuitive, but you can play around with the docking positions to get the feeling about it. In such inline components, the left parent docking point is usually in the same position as the child right docking point - that's where their abstract connectors are, so that you place them next to each other without gaps.
"childDockings": {
    "points": [
        {
            "mask": "shelfLeft",
            "position": "{width, 0, 0}",
            "rotation": "{0, 0, 0}",
            "condition": "true"
        },
        {
            "mask": "shelfRight",
            "position": "{0, 0, 0}",
            "rotation": "{0, 0, 0}",
            "condition": "true"
        }
    ]
}
- Last thing we need is to add the possible child leading to the same Id as the shelf has:
"possibleChildren": [
    {
        "componentId": "demoCatalogId:example_shelf"
    }
]
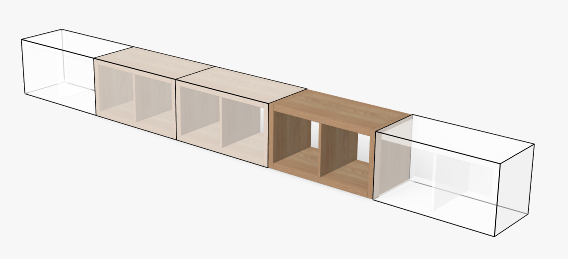
After you load the component, you can add the children next to each other, but you can see that the components collide into each other. The occupied docking points get deactivated for further docking, but if you dock a right child, it still has the left parent docking point, which needs to be deactivated separately and vice versa for the other side. To solve this, we will use self assignments at the child docking points.
- We choose the identifiers, according to the Naming Convention as
isShelfLeftChildandisShelfRightChild. Because these variables do not carry part list data or do not influence geometry or docking points on reloading, we can store them as internal variables and initialize them in an onUpdate - inited block:
"onUpdate": "
    if (ifnull(inited, false) == false) {
        inited = true;
        ...
        isShelfLeftChild = false;
        isShelfRightChild = false;
    }
    ...
"
In order to change the values during the docking event, we need assignments. You already know assignments from subComponents, where you made sure that the subComponent has the correct values from master, sending the values to the subComponent in every update loop. In docking, we have 10 types of assginments. We will use self assignments in the docking and undocking event in this case. More on the other types of assignments later.
- We add selfAssignments.onDock and onUnDock to the child docking point, resulting like this:
"childDockings": {
    "points": [
        {
            "mask": "shelfLeft",
            "position": "{width, 0, 0}",
            "rotation": "{0, 0, 0}",
            "condition": "true",
            "selfAssignments": {
                "onDock": {
                    "isShelfLeftChild": true
                },
                "onUnDock": {
                    "isShelfLeftChild": false
                }
            }
        },
        {
            "mask": "shelfRight",
            "position": "{0, 0, 0}",
            "rotation": "{0, 0, 0}",
            "condition": "true",
            "selfAssignments": {
                "onDock": {
                    "isShelfRightChild": true
                },
                "onUnDock": {
                    "isShelfRightChild": false
                }
            }
        }
    ]
}
Once the component docks, the assignments onDock are fired. The child docking points have self assignments onDock, adjusting the values of the internal variables in the context of the same component. However, we solve what happens during docking, but undocking can happen as well - when you delete the child or re-dock somewhere else. Therefore, all you assign during the life of a connection, be it on the parent or the child side, must be cleaned up once the connection stops existing. If you incremented a varaible during onDock, you have to decrement it back in onUnDock. If you assigned, you have to unassign or return to the default value. Omitting this will lead to logical errors.
- We have prepared the variables for use as parent docking points conditions directly. If the component is already docked as a left child (on the left side of the parent), the right parent docking point should be deactivated and vice versa.
"parentDockings": {
    "points": [
        {
            "mask": "shelfLeft",
            "position": "{0, 0, 0}",
            "rotation": "{0, 0, 0}",
            "condition": "!isShelfRightChild"
        },
        {
            "mask": "shelfRight",
            "position": "{width, 0, 0}",
            "rotation": "{0, 0, 0}",
            "condition": "!isShelfLeftChild"
        }
    ]
}
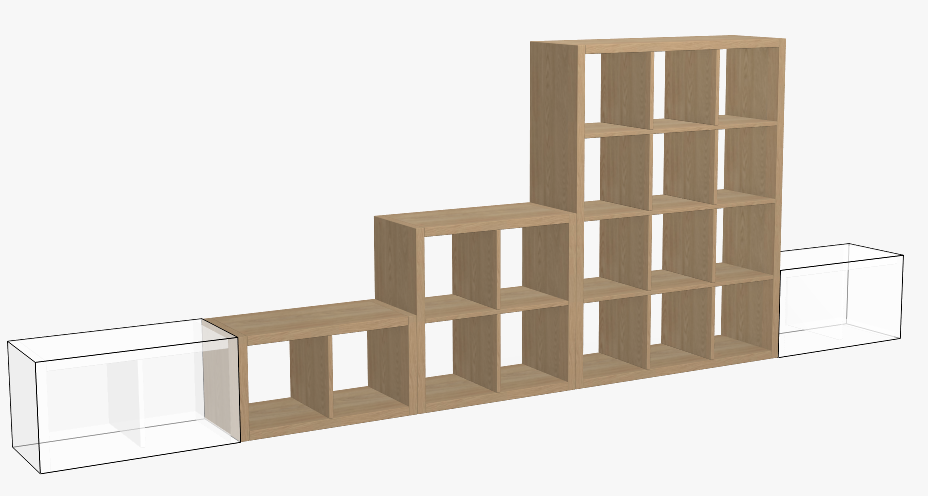
After you have done this improvement, the dockings should no longer collide:
# Docking Assignments
As mentioned earlier, a pair of docking points forms a connection instance. In the connection, there are 10 kinds of assignments, which we will look into. A docking point with full assignments will look like this:
{
    "mask": "mask",
    "position": "{0, 0, 0}",
    "rotation": "{0, 0, 0}",
    "onUpdate": "",
    "condition": "true",
    "assignmentsOnDock": {},
    "assignmentsOnUpdate": {},
    "assignmentsOnUpdateSilent": {},
    "assignmentsOnUnDock": {},
    "selfAssignments": {
        "onDock": {},
        "onUpdate": {},
        "onUnDock": {}
    },
    "assignmentScripts": {
        "onDock": "",
        "onUpdate": "",
        "onUnDock": ""
    }
}
The assignments can be divided into which side is the target of the assignment and when the assignment runs. Therefore, we have:
assignments: The component assigns to the other componentselfAssignment: The component assigns to itselfassignmentScripts: There is a script, in which you can read from and assign to components on both sides of the connection. You useother.andself.context prefixes in order to distinguish if the parameter or variable is in the same component or the one on the other side. AssignmentScripts should not be used if you can achieve the desired functionality via standard assignments, because they are more expensive to evaluate.
The assignments are also fired in different events:
onDock: Once the connection starts to exist (docking add-on or configuration reload), onDock assignments are fired on the parent and then on the child side.onUpdate: Once the update loop of the component with subComponent finished, the loop continues in the docking throught assingments onUpdate.onUnDock: Once the connection ceases to exist (child is deleted or undocked).
There are assignmentsOnUpdate and assignmentsOnUpdateSilent. The difference between those is, that if you assign into a parameter via assignmentsOnUpdate, its enabled attribute of the parameter is overridden to false (because the value would have been overridden anyway). In order to prevent this disabling, assignmentsOnUpdateSilent can be used, but it does not prevent the value from overriding anyway. You can do both-way assignmentsOnUpdateSilent to the same parameter to bind the parameter values between the two sides of the docking.
# Example: Shared walls between the parametrized shelves
In this example, we further extend the parametrized grid shelf. To utilize more of the docking potential, we will show you how to make the side walls to share in between the neighbouring components, resulting only in one wall displayed, which also moves the docking points around a little. This example will show you how to design an algorithm to decide who of the two neighbours draws the wall and how to transfer the data around.
The most important thing: define how the product should work, although it should not be the scripter's job, but rather the client's job. We have one constraint from the client: "The side walls are shared between the neighbours", which can be interpreted unambiguously given the fact, that two neighbours can have different heights. Anyway, most logical rule is: "The higher shelf has the wall." If the shelves are of the same height, only one of them should have it. See a few following example rules that can decide which of the shelves has the wall:
- The component with the higher unique runtime id has the wall.
- The parent has the wall.
- The left component has the wall.
Those first two approaches require that we do some more data transfers between the components and that some components would have two walls, some none, some only left, some only right, even if they have the same widths. The third rule does not take into account the docking hierarchy and is much simpler to implement, because you simply do:
hasLeftWall = height > heightFromLeft;
hasRightWall = height >= heightFromRight;
Where heightFromLeft and heightFromRight come from docking points via assignmentsOnUpdate ... notice that we also do the cleanup in onUnDock:
"parentDockings": {
    "points": [
        {
            "mask": "shelfLeft",
            ...
           "assignmentsOnUpdate": {
                "heightFromRight": "height"
            },
            "assignmentsOnUnDock": {
                "heightFromRight": 0
            }
        },
        {
            "mask": "shelfRight",
            ...
            "assignmentsOnUpdate": {
                "heightFromLeft": "height"
            },
            "assignmentsOnUnDock": {
                "heightFromLeft": 0
            }
        }
    ]
},
"childDockings": {
    "points": [
        {
            "mask": "shelfLeft",
            ...
            "assignmentsOnUpdate": {
                "heightFromLeft": "height"
            },
            "assignmentsOnUnDock": {
                "heightFromLeft": 0
            },
            ...
        },
        {
            "mask": "shelfRight",
            "assignmentsOnUpdate": {
                "heightFromRight": "height"
            },
            "assignmentsOnUnDock": {
                "heightFromRight": 0
            },
            ...
        }
    ]
}
Last: do not forget to initialize the heightFromLeft and heightFromRight to zero in the onUpdate-init block.
After you do this, you should get the following result:

Because one of the walls is always missing now, the docking points have to be adjusted as well. Therefore, you can modify the docking points coordinates to:
"parentDockings": {
    "points": [
        {
            "mask": "shelfLeft",
            "position": "{outerThickness * hasLeftWall, 0, 0}",
            ...
        },
        {
            "mask": "shelfRight",
            "position": "{width - outerThickness * hasRightWall, 0, 0}",
            ...
        }
    ]
},
"childDockings": {
    "points": [
        {
            "mask": "shelfLeft",
            "position": "{width - outerThickness * hasRightWall, 0, 0}",
            ...
        },
        {
            "mask": "shelfRight",
            "position": "{outerThickness * hasLeftWall, 0, 0}",
            ...
        }
    ]
}
HIGHLY IMPORTANT: Do you still remember the configuration reloading error we've mentioned before in this chapter? It will work here, because the outerThickness equals to 40, but if you change the thickness to more than 100, the configurations will fail to reload, therefore we move the hasLeftWall and hasRightWall from onUpdate-inited block and store them as boolean parameters in the saved configurations:
{
    "key": "hasLeftWall",
    "type": "Boolean",
    "defaultValue": true,
    "visible": false,
    "visibleInPartList": false
},
{
    "key": "hasRightWall",
    "type": "Boolean",
    "defaultValue": true,
    "visible": false,
    "visibleInPartList": false
}
# Docking Ranges
When you have a product, that has an array of docking positions, you can utilize the docking ranges. These are basically 3D arrays of docking points that are aligned with the coordinate system axes of the parent component. To use a docking range, you must have the range definition at the parent side and a docking point at the child side. Let's try to add a docking range to our parametrized shelf system.
First, we need a child you can dock. Therefore, we've prepared the addon for you here. Notice, that it has a child docking point with the mask shelf.
In order to create the range, we will add following code:
"parentDockings":{
    "points":[...],
    "ranges":[
        {
            "mask": "shelf",
            "position": "{outerThickness + sizeFieldX/2 , 0, outerThickness}",
            "stepEnd": "{width, 0, height - outerThickness}",
            "rotation": "{0, 0, 0}",
            "condition": "true",
            "stepX": "sizeFieldX + innerThickness",
            "stepY": 0,
            "stepZ": "sizeFieldX + innerThickness"
        }
    ]
}
You can see, that the range has some attributes you already know. Let's see what the new attributes are there for:
position: Position of the first docking point in the range.stepX,stepY,stepZ: Offset of the docking points in the X, Y and Z axes. If not present, their values defaults to 0. If the value is 0, the docking range does not grow in that respective direction.stepEnd: Ending bound of the docking range. The last docking point is the point with coordinates lesser of equal tostepEnd.condition: If the docking point is valid for every docking point separately. To distinguish between them, you can utilize properties from the connection context (which is also available in the assignmentScripts, should you need it):connection.index: integer - Index of the point in the array of the docking points.connection.position: Vector3f - Coordinate of the docking point in the docking range, in the parent's coordinate system.
# Multi-Selection Parameter Error Topic
When you dock multiple components to a configuration, you can utilize the multi-selection feature. You must keep this in mind already when writing parameters. The parameters that are shown in the multi-selection UI is a union of all parameters. Valid values are the intersection of valid values or value objects whose conditions evaluate to true. If a parameter has no valid values or value objects, it is considered that it can accept any value, therefore this does not limit the intersection.
In order to demonstrate what can happen, open this link (opens new window). Select the footstool to see that it has a width in UI with a single option of 90 cm, which also shows in the part list. Now, click the multi-selection icon in the left toolbar of the configurator window and select both the sofa and the footstool. You can now change the width to any value that the sofa has, which also gets assigned to the footstool, resulting in the following legs displacement:
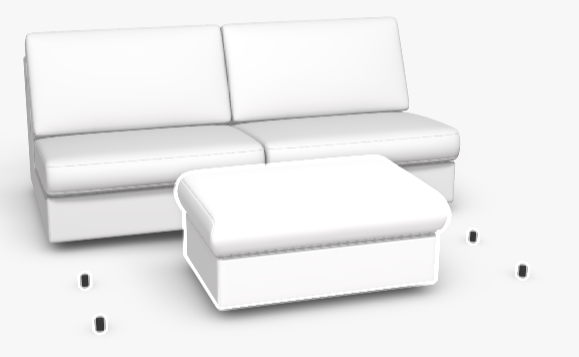
If you open the component definition of the footstool, you can see that the geometry has an external mesh displaying the footstool and legs, that are placed based on the width parameter, which has no validValues, just a default value of 900.
The parent sofa has also a width parameter with valid values 1600, 1850, 2100, overriding the null validValues of the footstool. The solution to this problem is simple: add "validValues": [900] to the child's width parameter.
Conslusion: If a user can directly access the UI of the component, always use relevant validValues or valueObjects, so that it can not be overridden from UI or configuration Json.
# Addons and Possible Children
The list of valid addons is a union of all possibleChildren with their conditions evaluated to true coming from all components.
Note: You need a componentId or itemId that actually exists in the RAPI in to see it in the add-ons list. If you need to test or develop, create an item or component with the id you are intending to use and update its definition later.
# Possible Child: itemId vs componentId - thumbnail, sort, category
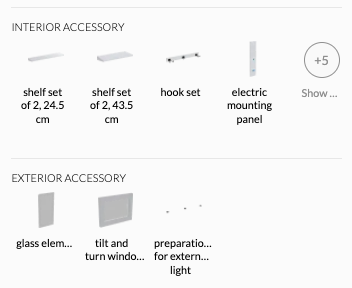
You can define a possible child both with its itemId or componentId. The difference is, that componentId leads to a component, itemId leads to an item - which provides a Configuration (see above). In live content, itemId should always be used. Possible children with componentId should be used only in development, but we recommend leaving them in the script with a constantly false condition, so that you keep track of component dependencies. Unlike componentIds, itemIds can have thumbnails, can be sorted using their sort values in the Rubens Admin and can be assigned to a category via tagging. In order to assign a category, use tag_ids_to_add, tag_ids_to_remove columns in a CSV import file or categorize in Rubens Admin manually. For changing sort of the addons, you need sort column. See more details in the Rubens Admin Help > Import sort values chapter.
See a screenshot of an addons list, that uses categories (external and internal accessories) and is also sorted.
# Hiding Addons in the List
A very common situation is that only the addons, that can still be docked, show in the addons list. In other words: prevent the end-user from getting the "Sorry, but adding is not possible" message. This is easy to implement in cases where you can dock one or two addons, but hard in cases where you have docking ranges. A balance between implementation efforts and UX advantages should be consider in such cases.
An example on how to implement this follows for Sessel_Jenson. You can see that there is one possible child in the list.
    ...
    "parentDockings": {
        "points": [
            {
                "rotation": "{0, 0, 0}",
                "mask": "candy:HockerJenson",
                "position": "{0, 700, 0}",
                "assignmentsOnUpdate": {
                    "material": "material",
                    "LegMaterial": "LegMaterial"
                }
            }
        ]
    },
    "possibleChildren": [
        {
            "itemId": "candy:Hocker_Jenson"
        }
    ],
    ...
We add a variable hasFootstoolDocked initialized to false in onUpdate. This variable will hold the state whether the footstool has already been docked, so that the possible child will have condition accordingly. To set the actual state of this variable, selfAssignments.onDock will be used. Therefore we will expand the part as follows:
    "onUpdate": "
        if (ifnull(inited, false) == false) {
            inited = true;
            hasFootstoolDocked = false;
        }
    ",
    "parentDockings": {
        "points": [
            {
                "rotation": "{0, 0, 0}",
                "mask": "candy:HockerJenson",
                "position": "{0, 700, 0}",
                "assignmentsOnUpdate": {
                    "material": "material",
                    "LegMaterial": "LegMaterial"
                },
                "selfAssignments": {
                    "onDock": {
                        "hasFootstoolDocked": true
                    },
                    "onUnDock": {
                        "hasFootstoolDocked": false
                    }
                }
            }
        ]
    },
    "possibleChildren": [
        {
            "itemId": "candy:Hocker_Jenson",
            "condition": "(!hasFootstoolDocked)"
        }
    ],
Notice, that the condition (!hasFootstoolDocked) is in brackets. Their purpose is to make the parser more robust. Also, as we set the variable to true in onDock self assignment, we need to set it back in onUnDock, otherwise we can not dock the footstool again once we will already have deleted it - until the configuration is relaoded. Full example code
Best practice: In onUpdate, have variables with a name show<PossibleChildCategory>PossibleChildren, which would have been showFootstoolPossibleChildren in the above case. However, example above is a small script, where it is not that necessary. You can check Sofa System Master Template to see how it improves legibility in more complex component definitions - there it is defined whether to show or hide which kinds of possibleChildren in one place.
# Addons in Parameter Groups
There are two ways to display addons:
- In the menu behind the "+ Add an element" button

This is the default behaviour. You do not need to do anything in order to achieve this.
- Together with parameters of a parameter group:
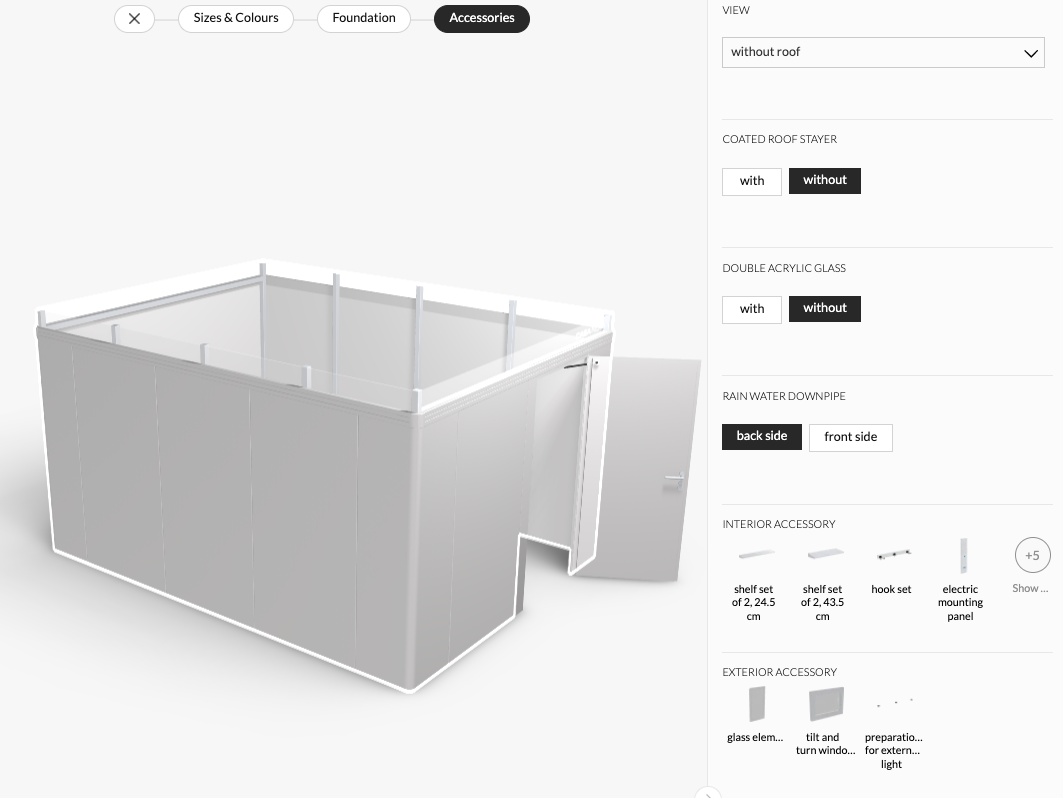
This is especially useful if you consider the configurator as a wizard, navigating the end-user through the groups from left to right.
An example is the Nordic-Design sofa system configurator (opens new window) - you are in a group called "Elements", where the addons show in the global context.
In the Biohort CasaNova garden house configurator (opens new window) you first select the size. Then you continue with doors selection, where you also have some doors addons. The last group, accessories, then allows you to dock both internal and external accessories. This is bound together with the activeGroupInView() in order to hide the roof, so that it is easier for you to dock the internal accessories.
In this case, you need a standard parameterGroup definition and you use the group's key in possibleChild.group attribute. Example from above screenshot:
    "parameterGroups": [
        {
            "key": "grp_color_size",
            "labels": {
                "en": "Sizes & Colours"
            },
            "sort": "1"
        },
        {
            "key": "grp_door",
            "labels": {
                "en": "Door"
            },
            "sort": "2"
        },
        {
            "key": "grp_foundation",
            "labels": {
                "en": "Foundation"
            },
            "sort": "3"
        },
        {
            "key": "grp_extra",
            "labels": {
                "en": "Accessories"
            },
            "sort": "4"
        }
    ],
    ...
    "possibleChildren": [
        {
            "itemId": "isdt:CasaNova_Kippfenster",
            "group": "'grp_extra'"
        },
        {
            "itemId": "isdt:CasaNova_glaselement",
            "group": "'grp_extra'"
        },
        {
            "condition": "...",
            "itemId": "isdt:CasaNova_Standardtuer",
            "group": "'grp_door'"
        },
        {
            "itemId": "isdt:CasaNova_Klapptisch",
            "group": "'grp_extra'"
        },
        ...
    ]
# Docking Multiple Components
In the Moebe Shelf System (opens new window), you can notice that the shelf system consists of 4 rods, on which shelves are places. The rods are in the master component, which provides a docking range for the individual shelves:
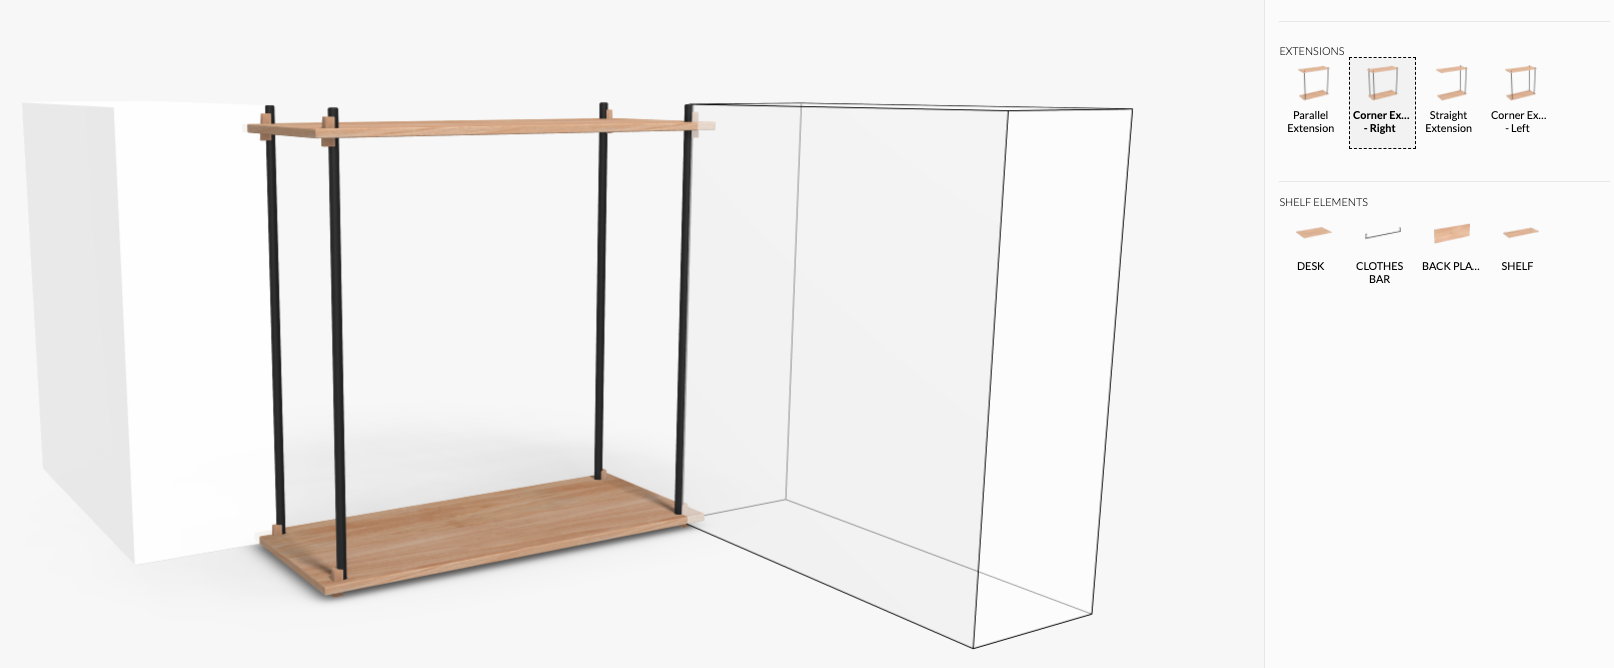
For this product, it makes no sense to have only the 4 rods, therefore also the shelves need to be added in the extensions. The item you are docking via the itemId can have its children pre-docked. You can do this by assembling the configuration in the HSC test site, then use Interactions > Get Current Config, which you can use as a configuration definition of an item. You do not need to do anything in the script, the whole configuration hierarchy will dock as long as all the conditions are valid and everything fits.
Note: In case of Moebe, workaround parameters disabling the individual legs were introduced, so that the product thumbnails could be generated.
# When to Use Which Assignments?
It can sometimes be tricky to decide which docking assignment should be used in particular cases. This subchapter provides suggestions to help you decide.
Rule 1: If possible, always let the components do their own job by themselves.
If you do not need to get the neighbouring component involved in a logic, then don't. Do as much as possible in one place. This rule leads to using selfAssignments to get information on "this dockpoint is used", like in the above example.
Rule 2: Use standard assignments wherever you need to push or collect data.
In a scenario, where you not only need to know that something is docked, but also what is docked, it is useful to send information via standard assignmentsOnDock (if this information is constant) or assignmentsOnUpdate (if this information can change). If you need to collect count of docked elements in a row, use assignmentsOnUpdate, where you do "countOf*DockedOnLeft": "countOf*DockedOnLeft + 1 if you're going from left to right. Don't forget to "countOf*DockedOnLeft": 0 in assignmentsOnUnDock.
Rule 3: Do not use onUpdate assigmnents if the assigned value does not change.
If the value you are assigning is never changing, use only an onDock assignment (appliable for assignments, selfAssignments and assignmentScripts). Do it when you are sure the value can not change. Assignments onUpdate are more expensive and can trigger unnecessary update loops, lowering the performance. If there is a chance that the changes, use an onUpdate assignment.
Rule 4: Do not use assignmentScripts unless necessary.
They are more performance expensive and thus more prone to lowering performance. You need them if you need to check what is on the other side to pull information or create a logic that involves both sides of the connections.
Rule 5: Use assignmentsOnUpdateSilent if the target is a parameter.
Otherwise the parameter options are set to disabled. You can use a two-way assignmentsOnUpdateSilent to sync parameters in neighbouring components.
# Dos and Don'ts
DO: onUnDock Cleanup
If you assign something, never forget to make a cleanup using onUnDock assignments in order to stop the component behaving like if something is still docked. This is important, because you can drag and drop a component in the configurator somewhere else, making onUnDock calls in the old connection and onDock calls in the new connection.
DO: Call all assigned variables in a meaningful and easy-to-understand way.
You will appreciate this when you return to the component after one or more years to implement a fix or a change. Or another scripter that takes over the project appreciates this. See the Naming Convention of Components, Items, Parameters, Variables chapter for more details. In short, the identifier should contain info on which docking (mask), which side of the docking (parent/child/neighbour) and what it means.
DO: Place the docking point coordinate in a place where it makes sense.
Similar to Pivot convention in 3D models, using a good place for the docking points makes the life easier.
- If a product is intended to be placed in front of the wall, put the docking points in the rear bottom line, at the left and right edges of the product. This will form an abstract line where the wall meets the floor, making the docking positions easy and adjustable.
- If above rule is not appliable, and there is a physical connector, place the docking points in the connector.
- If there are more connectors (like Moebe Shelf System (opens new window)), place the docking points in one of them or centered between them.
NEVER place docking points somewhere outside of the geometry, unless it makes sense in a rare case. Placing a sofa dockpoint one meter behind a sofa part will bring a lot of confusion.
DO: Check if docked configurations reload correctly.
Everything leading to docking point conditions and coordinates must be computable from the configuration. Test configuration reloads as often as possible while developing docking.
DON'T: If you use increment or decrement assignment, do not store it as a parameter.
For example: You have a count of shelves in a shelf system, where you store the total count in shelvesDockedCount initialized to 0. You do "shelvesDockedCount": "shelvesDockedCount + 1" in onDock and -1 in onUnDock. If you dock three shelves, the value is 3. If you reload the configuration and shelvesDockedCount is a parameter, you reload the configurator with value 3 already, and onDock assignments are still called. This results in having value 6, which is incorrect and will cause trouble. When you delete all shelves, the component behaves as if 3 shelves were docked.
DON'T: Complex computations in dock points positions.
Prepare complex computations in onUpdate. They should be a function of stored parameters. If you need to store a value in order to get a proper docking, store needed data as parameters.
