# Dimensioning
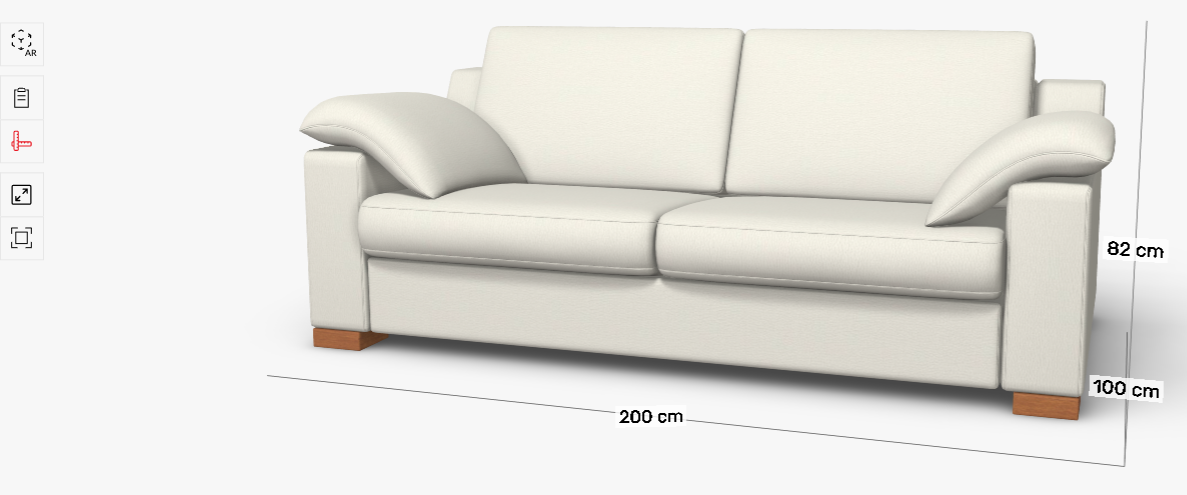
Roomle Configurator is capable of showing overall dimensions of the configurator, as well as axis aligned dimensions that can be defined for individual components. To enable the dimensions, allow the dimensions display in the left menu bar of the configurator - see the red marked icon in the screenshot:

# Measurement Box
The overall dimensions of a configuration are given by an envelope of the individual components' bounding boxes. These bounding boxes are defined as an union of all meshes' bounding boxes. These are defined by the two last arguments of the AddExternalMesh function.
You can override the overall dimensioning for every main component using the setBoxForMeasurement. If you dock several components together, the overall dimensions of the configuration will be the envelope of union of all component's bounding boxes. This function can solve errors where the actual geometry is slighly smaller or bigger, which often happens with soft upholstered furniture or cushions. Be aware, that if you have three or more components docked next to each other, the connection distance must be correctly modelled in the geometry. There is no simple way to compensate overall dimensions of imperfect geometry if the configuration is docked.
# Example: Overriding measurements with the setBoxForMeasurement Function
This function is valid in the onUpdate script.
setBoxForMeasurement(size: Vector3f, offset: Vector3f)
Example: setBoxForMeasurement(Vector3f{1720, 840, 1960}, Vector3f{0, -640, 0});
This adds a cube with dimensions {1720, 840, 1960} with pivot in its back left lower corner and moves it by -640 along t y axis. It is the same as if you had:
AddCube(Vector3f{1720, 840, 1960});
 MoveMatrixBy(Vector3f{0, -640, 0});
We suggest following pattern to compute the bounding boxes:
- have variables
measurementBox_sizeX,measurementBox_sizeY,measurementBox_sizeZ,measurementBox_offsetX,measurementBox_offsetY,measurementBox_offsetZ - compute them in onUpdate
- use
setBoxForMeasurement(Vector3f{measurementBox_sizeX, measurementBox_sizeY, measurementBox_sizeZ}, Vector3f{measurementBox_offsetX, measurementBox_offsetY, measurementBox_offsetZ});- you can of course use constants in this functions something like
- measurementBox_sizeX/2 + measurementBox_offsetXfor the X-offset coordinate if your pivot point is in the center-rear-lower edge - you can of course utilize parameters like
width,depthandheightdirectly if the overall measurement matches with them
- you can of course use constants in this functions something like
Hint: You can visualize the bounding boxes during development like this:
"onUpdate": "
    ...
    setBoxForMeasurement(Vector3f{measurementBox_sizeX, measurementBox_sizeY, measurementBox_sizeZ}, Vector3f{measurementBox_offsetX, measurementBox_offsetY, measurementBox_offsetZ});
",
"debugGeometry": "
    AddCube(Vector3f{measurementBox_sizeX, measurementBox_sizeY, measurementBox_sizeZ});
     SetObjSurface('isdt:black_transparent');
     MoveMatrixBy(Vector3f{measurementBox_offsetX, measurementBox_offsetY, measurementBox_offsetZ});
"
To use debugGeometry, concantenate it to standart geometry in loader snippets. See Advanced Loader Snippet.
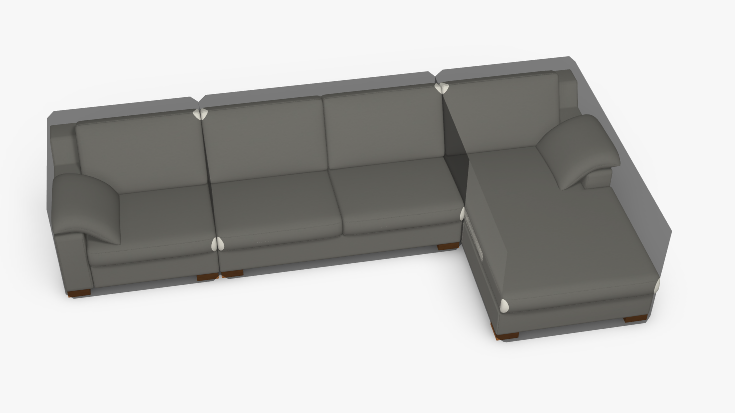
See example of a sofa system with visualized bounding boxes. Bevel size of 50 used as an argument in the AddCube function in order to see the edges of the particular bounding boxes easier.

# Custom Dimensions
If you need to show to the end-user of the configurator distinctive dimensions of the product's parts, you can do so using the dimensionings feature. This will draw a dimensioning line which is parallel with one of the coordinate axes. You define two points on selected axis, where the configurator then shows the dimensions.

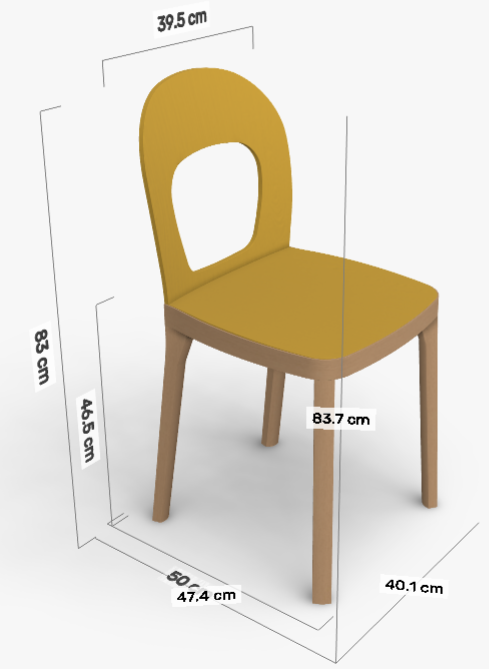
In this chair, the dimensionings have been used to display the seat width and the seat height. In order for the configurator to allow this, you use dimensionings attribute of the Component:
{
    "id": "catalog_id:chair_dimensions",
    ...
    "dimensionings": [
        {
            "level": 2,
            "type": "z",
            "from": "0",
            "to": "465",
            "visible": true
        },
        {
            "level": 1,
            "type": "z",
            "from": "0",
            "to": "830",
            "visible": "elementType == 'chair'"
        }
    ]
}
Attributes of the Dimensioning class:
- level You can display the dimensionings in several layers. The higher the number, the closer to the component and smaller the dimensioning is.
- type Can be
x,yorz. Specifies on which axis the dimensioning should be displayed. - from Starting coordinate on the selected axis.
- to Ending coordinate on the selected axis.
- visible Expression defining if the dimensioning should be shown.
- labels Works as any other
labels, allowing you to override the dimensioning number in different languages. Note, that it is currently not possible to display the actual dimension computed from thefromandtoattributes.
