# 3D Models & Meshes
Unfortunately, not everything can be done from primitives, be it for lack of primitive shapes or too much work. To display just about any shape, you will be using meshes intensively in the content projects. There are several ways to add more complex geometry:
- make your own mesh in the script
- use extrusion of a shape made of list of vertices
- use external mesh, that is loaded from the database
# Theory
First, a few words how meshes are handled in Roomle. Every mesh consists of a list of vertices (sgl. vertex). Those vertices are connected with triangles, that are stored as 3-tuples of indices leading to 3 vertices. One sided material (which is standard) is then shown on the side according to the left-hand rule (fingers of left hand wrap the vertices of the triangle, thumb pointing in the direction from which the surface is visible). Next propery is the list of UV coordinates follows, which are the coordinates of the material's textures in milimeters. Last property relevant in the mesh data are the vertex normals, which define the axis used to reflect light.
Intention of this article is not to give more general details on meshes, therefore please refer to other sources of informations, like Polygon mesh (opens new window), Surface normal (opens new window), UV mapping (opens new window).
Note: Standard UV mapping is normalized, meaning the texture coordinates are following {0, 0} - lower left corner, {1, 1} top right corner in the image. However, in order to be able to skin primitives easily, Roomle uses UVs that are in milimeters of the real representation of the texture. This is also why real-world sizes of the texture cutouts are stored in Rubens Admin. This brings an advantage that materials can be used universally accross all content projects, the downside is, that it takes effort to recompute the UV mapping in a model.
# AddMesh
In order to get used to the theory, following example will lead you through using an AddMesh function to draw a rectangle. A quad consits of 4 vertices. To connect them with triangles, we are going to need two of them. Therefore, we recommend using a similar sketch like:
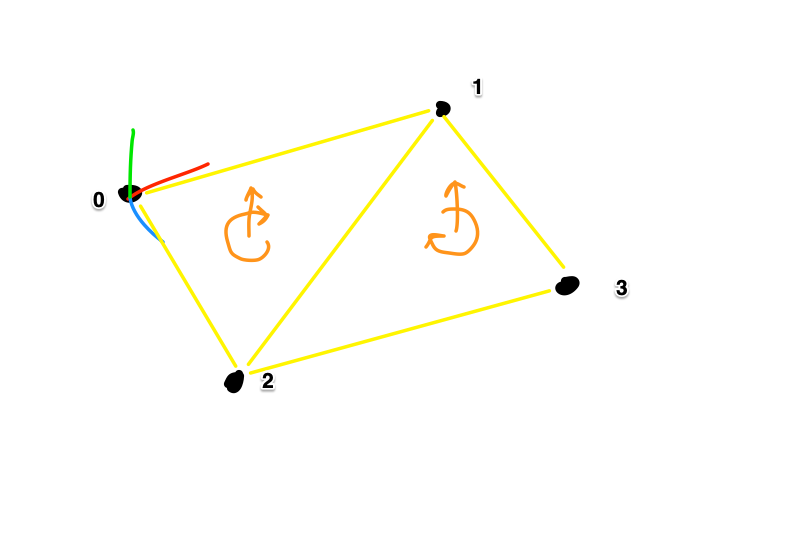
You can see the coordinate system (zero position of the mesh) in the rear left corner. We assign indices to the vertices and connect them in two triangles using the yellow lines. In orange, we've drawn the order of the vertices that will be used in the triangles.
When you start typing AddMesh, you can insert a snippet:
AddMesh(Vector3f[{0, 0, 0}, {1000, 0, 0}, {0, 1000, 0}], [0, 1, 2], Vector2f[{0, 0}, {0, 1000}, {1000, 0}], Vector3f[{0, 0, 1}, {0, 0, 1}, {0, 0, 1}]);
The lists go as following: vertices, triangles, UVs, normals. Let's do them one-by-one:
Vertices: Rear left corner is {0, 0, 0}, front right corner is {width, depth, 0}. Therefore, we start the function as follows:
AddMesh(
    Vector3f[
        {0, 0, 0},              /* vertex 0 position */
        {width, 0, 0},          /* vertex 1 position */
        {0, depth, 0},          /* vertex 2 position */
        {width, depth, 0}       /* vertex 3 position */
    ],
    ...
);
Triangles: To display the triangles in the correct order, we not write 3-tuples of integer indices:
AddMesh(
    ...
    [
        0, 1, 2,
        1, 3, 2
    ],
    ...
);
UV coordinates: Because we have a simple mesh, in this case the first two coordinates of the vertices are equal to the UV coordinates.
AddMesh(
    ...
    Vector2f[
        {0, 0},              /* vertex 0 UV coordinate */
        {width, 0},          /* vertex 1 UV coordinate */
        {0, depth},          /* vertex 2 UV coordinate */
        {width, depth}       /* vertex 3 UV coordinate */
    ],
    ...
);
Normals: The mesh is flat, normals should point directly upwards:
AddMesh(
    ...
    Vector3f[
        {0, 0, 1},  /* vertex 0 normal */
        {0, 0, 1},  /* vertex 1 normal */
        {0, 0, 1},  /* vertex 2 normal */
        {0, 0, 1}   /* vertex 3 normal */
    ]
);
The whole script:
{
    "id": "catalogId:200_100_10_addmesh_quad",
    "geometry": "


        width = 300;
        depth = 400;
        AddMesh(Vector3f[
                {0, 0, 0},
                {width, 0, 0},
                {0, depth, 0},
                {width, depth, 0}
            ], [
                0, 1, 2,
                1, 3, 2
            ], Vector2f[
                {0, 0},
                {width, 0},
                {0, depth},
                {width, depth}
            ], Vector3f[
                {0, 0, 1},
                {0, 0, 1},
                {0, 0, 1},
                {0, 0, 1}
            ]
        );
         SetObjSurface('demoCatalogId:grid');
    "
}
This however will produce a flashing artifact:
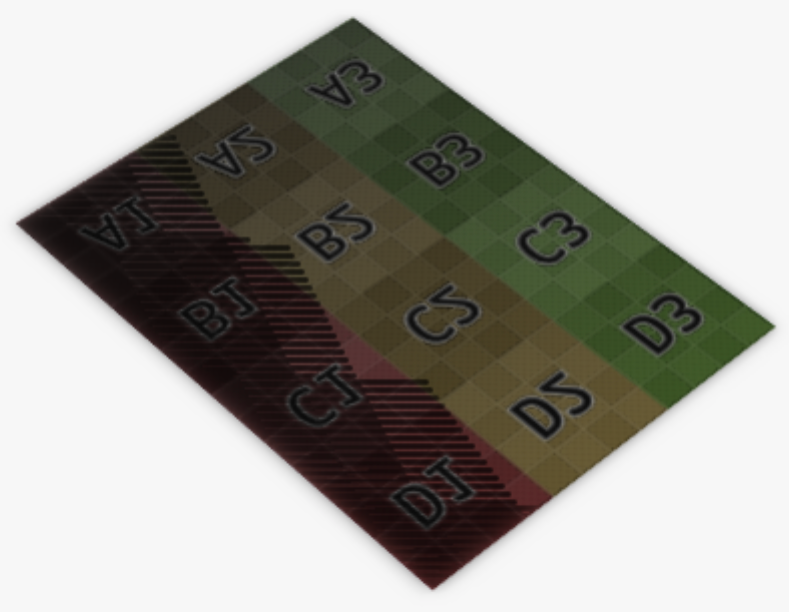
This happens, when there are two coplanar sufraces that have a different material or UV coordinates. The renderer then draws one surface over the other in the same time. The ground plane carries a texture which simulates the shadow under the geometry, therefore this happens. To solve this, you can move the mesh upwards by 1mm and draw a tiny cube underneath it.
You can also notice that the material on the surface is upside down and mirrored. In order to solve that, you can rewrite the UV coordinates to:
...
Vector2f[
{0, depth},
{width, depth},
{0, 0},
{width, 0}
], ...
# Primitives, UV settings and Bevels
RoomleScript has functions that will instantiate primitives. They can be used in three forms: standard, with UV settings, with UV settings and bevel size. See difference between the standard and extended versions:
/* standard */
AddCube(      Vector3f{1000, 1000, 1000});
AddCylinder(  1000, 1000, 2000, 16);
AddPrism(     100, Vector2f[{0, 0}, {100, 0}, {0, 100}]);
AddRectangle( Vector2f{100, 100});
AddSphere(    Vector3f{1000, 1000, 1000});

/* with UV settings and bevel */
AddCube(      Vector3f{1000, 1000, 1000},                  Vector2f{1, 1}, 0, Vector2f{0, 0},       2);
AddCylinder(  1000, 1000, 2000, 16,                        Vector2f{1, 1}, 0, Vector2f{0, 0},       2);
AddPrism(     100, Vector2f[{0, 0}, {100, 0}, {0, 100}],   Vector2f{1, 1}, 0, Vector2f{0, 0},       2);
AddRectangle( Vector2f{100, 100},                          Vector2f{1, 1}, 0, Vector2f{0, 0});
AddSphere(    Vector3f{1000, 1000, 1000},                  Vector2f{1, 1}, 0, Vector2f{0, 0});
All of the extended have possibility to scale UVs in the vertices, rotate UV map and offset UVs. The last argument is the bevel size at the edges (note, that bevel does not make sense at a sphere and at a rectangle).
# AddPrism
Using AddPrism function, you can extrude a 2D sketch in a perpendicular direction. This is useful for creating scalable rail profiles. To define a prism, provide extrusion length followed by list of vertices in the ground plane. Prism is then always pointing up and you have to use RotateMatrixBy functions to align it to a desired direction.
This part will describe two examples: a drawer with chamfered bottom and handle made of prisms and a window frame made of 4 prisms, including UV alignments and prettifying operations.
# Example: Drawer Front with Handle from AddPrism
In this example, we will make a drawer front using two prisms. When the shapes are simple, they can easily be scripted without the need of 3D modelling. See image how it should look like:
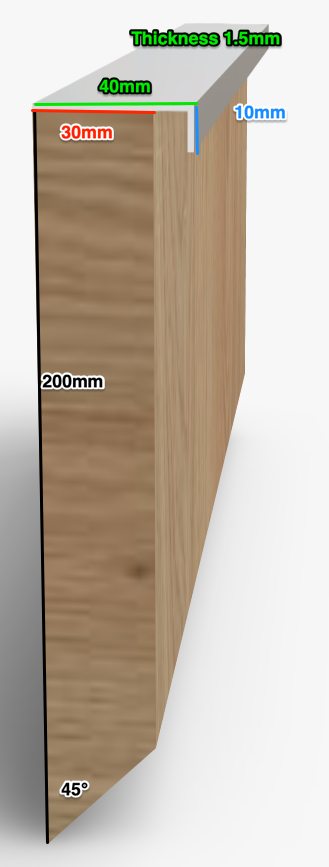
In order to draw the prisms, it is good to choose a 2D coordinate system in which you can easily work with the shape. In next step, mark the vertices in a it will create a loop when connecting them. Next step is to find their coordinates in your choosen system.
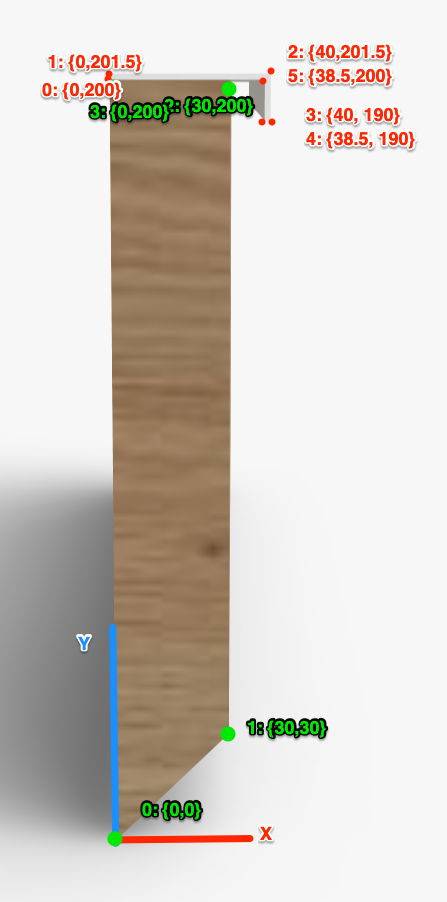
From this, we can already prepare the AddPrism functions. We will use variables instead of constants to parametrize the output.
length = 400;
height = 200;
height_profile = 40;
thickness_wood = 30;
thickness_profile = 1.5;
depth_handle = 40;
height_handle = 10;

/* wood */
AddPrism(length,
    Vector2f[
        {0, 0},
        {thickness_wood, thickness_wood},
        {thickness_wood, height},
        {0, height}
    ]
);
 SetObjSurface('isdt:surface_oak');

/* rail */
AddPrism(length,
    Vector2f[
        {0, height},
        {0, height + thickness_profile},
        {depth_handle, height + thickness_profile},
        {depth_handle, height - height_handle},
        {depth_handle - thickness_profile, height - height_handle},
        {depth_handle - thickness_profile, height}
    ]
);
 SetObjSurface('demoCatalogId:chrome');
Keep in mind, that you are drawing in the ground plane of the Roomle Configurator's coordinate system. Therefore, we've basically drawn these shapes upside down in the ground plane. Therefore, we must rotate this afterwards:
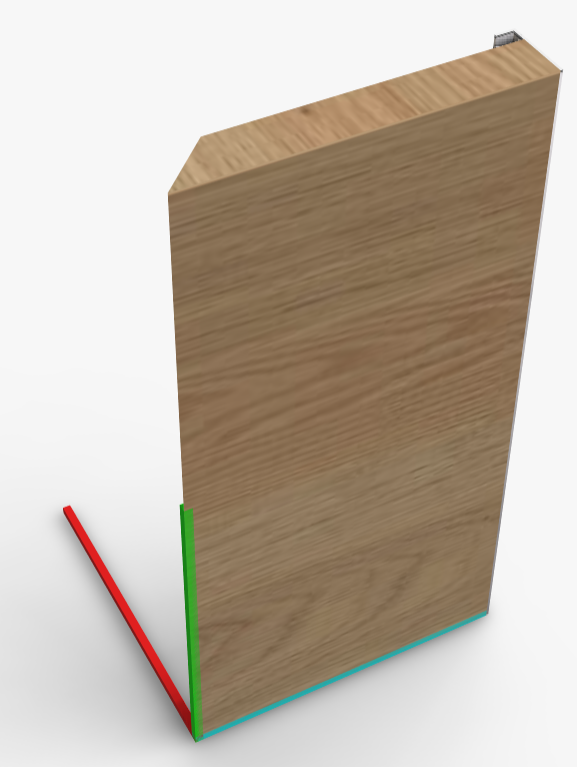
To put it upwards on the ground plane, we must do a +90 degrees rotation along X axis and +90 degress along Z axis to make it front facing along Y axis.
Next thing you can notice, the wood grain in the texture is not mapped properly. The texture file has the grain in horizontal direction. Sides of the AddPrism (and AddCube as well) are mapped vertically. Therefore, we must apply 90 degrees rotation.
BeginObjGroup();
    ...
EndObjGroup();
 RotateMatrixBy(Vector3f{1, 0, 0}, Vector3f{0, 0, 0}, 90);
 RotateMatrixBy(Vector3f{0, 0, 1}, Vector3f{0, 0, 0}, 90);
You can see the final version of the example in: 200_100_20_addprism_handle.json.
# Example: Window Frame
In this example, we make a window frame that is made using chamfered profiles under the angle of 45 degrees. We will have parameters width and height and using them, we draw a window with given frame thickness.
thickness = 75;
depth = 20;

AddPrism(depth, Vector2f[
        {0, 0},
        {width, 0},
        {width - thickness, thickness},
        {thickness, thickness}
    ], Vector2f{1, 1}, 0, Vector2f{0, 0}
);
 SetObjSurface('isdt:surface_oak');
Copy();
 SetObjSurface('isdt:white');
 RotateMatrixBy(Vector3f{0, 0, 1}, Vector3f{width / 2, height / 2, 0}, 180);

AddPrism(depth, Vector2f[
        {0, 0},
        {thickness, thickness},
        {thickness, height - thickness},
        {0, height}
    ], Vector2f{1, 1}, 90, Vector2f{0, 0}
);
 SetObjSurface('isdt:surface_oak');
Copy();
 SetObjSurface('isdt:white');
 RotateMatrixBy(Vector3f{0, 0, 1}, Vector3f{width / 2, height / 2, 0}, 180);
Notice that we use UV rotation 90 degrees in the vertical plank in order to have a different mapping (as we learned in previous example). We do one half in wood and other half in white in order to demonstrate some imperfections:
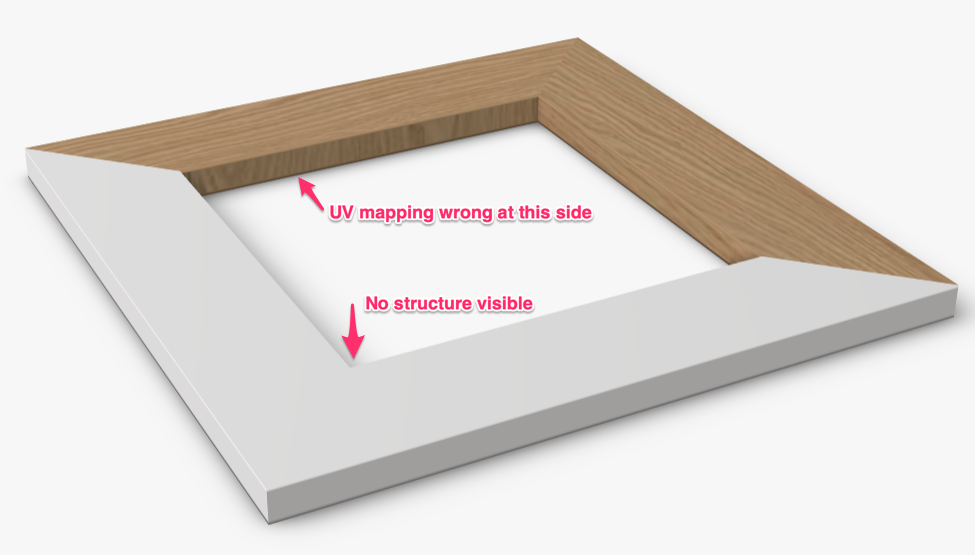
Although we turned the wood texture by 90 degrees, it also turned the texture on the edge improperly. On the white part, you can not distinguish any surface change in the corner, appearing like it is made from one solid part, although in reality, you can distinguish the windows shapes.
To fix those errors, we draw one of the prisms in the X direction instead of Y direction and rotate afterwards and we introduce a gap, so that the surface structure is properly visible.
To rotate a shape in 2D, you can do it (by mathematical definition) achieve this simply by switching the coordinates and multiply one of them by -1. Based on whether you want to rotate by + or - 90, you multiply one or the other. In our case, Y coordinates need to be multiplied. This way, we draw the planks back to back and rotate by 90 degress to close the shape of the window.
AddPrism(depth, Vector2f[
        {0, 0},
        {thickness, -thickness},
        {height - thickness, -thickness},
        {height, 0}
    ]
);
 SetObjSurface('isdt:surface_oak');
 RotateMatrixBy(Vector3f{0, 0, 1}, Vector3f{0, 0, 0}, 90);
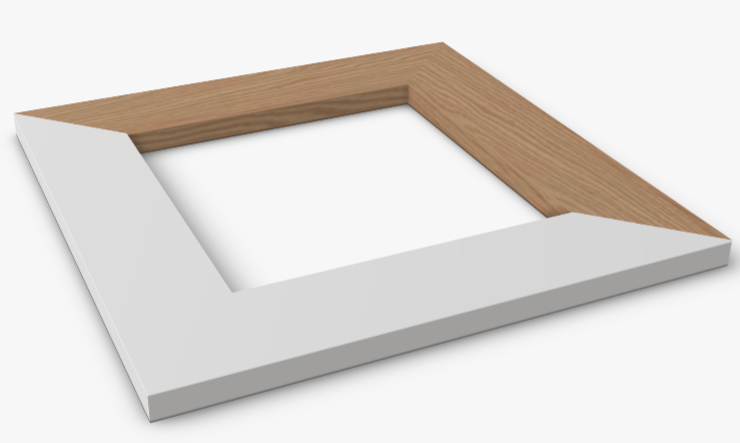
Now we introduce the gaps, and close them. In order to do so, we define the gap size and fill them with cubes:
gap = 0.5;

BeginObjGroup();
    AddPrism(depth, Vector2f[
            {gap, 0},
            {width - gap, 0},
            {width - thickness - gap, thickness},
            {thickness + gap, thickness}
        ], Vector2f{1, 1}, 0, Vector2f{0, 0}
    );
     SetObjSurface('isdt:surface_oak');
    Copy();
     SetObjSurface('isdt:white');
     RotateMatrixBy(Vector3f{0, 0, 1}, Vector3f{width / 2, height / 2, 0}, 180);

    AddPrism(depth, Vector2f[
            {gap, 0},
            {thickness + gap, -thickness},
            {height - thickness - gap, -thickness},
            {height - gap, 0}
        ]
    );
     SetObjSurface('isdt:surface_oak');
     RotateMatrixBy(Vector3f{0, 0, 1}, Vector3f{0, 0, 0}, 90);
    Copy();
     SetObjSurface('isdt:white');
     RotateMatrixBy(Vector3f{0, 0, 1}, Vector3f{width / 2, height / 2, 0}, 180);

    AddPlainCube(Vector3f{thickness-2*gap, height - 2 * gap, depth - 2 * gap});
     SetObjSurface('isdt:black');
     MoveMatrixBy(Vector3f{ gap , gap , gap });
    Copy();
     SetObjSurface('isdt:white');
     MoveMatrixBy(Vector3f{ width - thickness , 0 , 0 });
EndObjGroup();
Result of this:
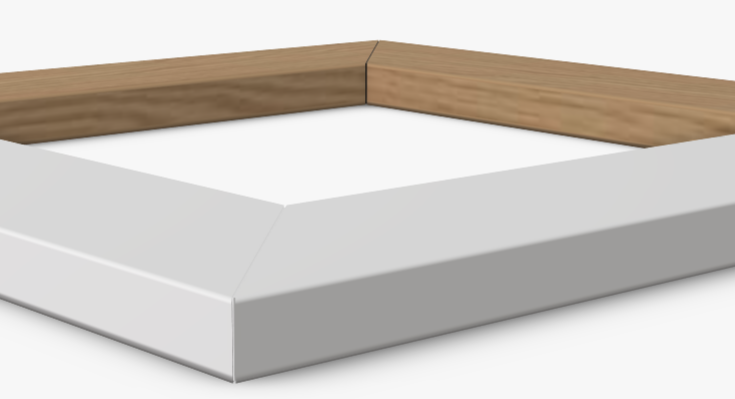
# AddExternalMesh
AddExternalMesh function is used to instantiate a mesh stored in RAPI by its name. Meshes are exported from the Blender Plugin in either PLY or OBJ format along with a text file containing the AddExternalMesh function prescriptions. The function contains meshName, bounding box dimensions and offset (like these were arguments AddCube + MoveMatrixBy). The bounding box is displayed before the mesh downloads.
The resulting folder with meshes in PLY or OBJ formats must be zipped and uploaded to the catalogue using Rubens Admin Import/Export page of that catalogue. Meshes with the same name (regardless on the PLY/OBJ suffix) are then overwritten. Change should be visible immediately in next configurator call, but sometimes caching may cause that changes in the overwritten meshes are visible in up to 1 hour.
See prescription of the function, including an example:
AddExternalMesh(meshName : String, boundingBoxDimensions : Vector3f, boundingBoxOffset : Vector3f);

AddExternalMesh('demoCatalogId:sofa_footstool_90', Vector3f{900, 600, 370}, Vector3f{ -450, -300, 50});
After you'll have instantiated the mesh, you can apply the same modifier functions as you're used to applying in other Add* functions.
# Modifying External Mesh
As of 2023, new functions are available to modify any geometry, regarding the scaling and UV modifications.
Use ScaleMatrixBy
Use
AddExternalMeshwith UV settings. As with any otherAddfunction, you now can add UV modifier parameters. Extend your function by adding them:
AddExternalMesh(meshName : String, boundingBoxDimensions : Vector3f, boundingBoxOffset : Vector3f, uvScale : Vector2f, uvRotation : float, uvOffset : Vector2f);

AddExternalMesh('demoCatalogId:sofa_footstool_90', Vector3f{900, 600, 370}, Vector3f{ -450, -300, 50}, Vector2f{1, 1}, 0, Vector2f{0, 0});
# Pivot Convention
In order to work with the meshes well, the mesh should be placed in the coordinate system properly. It can't be said where the pivots should be in 100% of the cases. Generally, those rules are good to follow:
- If the object is intended to be free standing on the ground, place the pivot to the center of the bottom base. Example: footstool, table, chair
- If the object is intended to be standing next to a wall (or usually stands there) or mounted on it, place the pivot to the center of the back bottom edge, so that it is standing in front of the wall without moving. Example: shelf, TV board, sofa
- If the object is intended to mount somewhere, place the pivot in the mounting, so that it is easy to align. Center the pivot between two of more mounts (but this is to be individually analysed).
# Scalable Internal Mesh Example
You can also adjust the scaling of a mesh on your own in the script. This is not something that should be done unless really needed. Internal meshes with computation can have a dramatic impact on the configurator performance.
Those topics mostly are not simple and require special decomposition of the mesh in order to be able to recompute them. In this case, our objective is to make a cable hole for a table, that scales. We have modelled a quad with a hole and inner surface of the hole as two separate models. We need to make the hole scalable in diameter and height. Resulting internal meshes coming from the 3D team can be seen here: 200_100_40_quad_hole.txt.
The models are centered in the hole center. Diameter of the hole is 65, size of the quad around it is 105 units.
You can follow steps we made in reproducting this:
- The quad
- Take the quad mesh and open it in a separate window of VS Code
- Separate the mesh in a way that you have every Vector2f or Vector3f on its own line. You can use multi-cursor edit feature in VS Code to achieve this quickly. Select
},,}],[{and inject endlines. - Result looks like this:
AddMesh(Vector3f[
    {52.5,-52.5,0},
    {12.4,-30,0},
    {23,-23,0},
    {-52.5,52.5,0},
    ...
- The quad dimensions is 105, centered, meaning coordinates of the edges are ±52.5. All other coorinates belong to the holes with diameter of 65 (radius 22.5). Our target is to be able to draw the edges using coordinates
leftX,rightX,rearY,frontYand usediameterto define the hole. - Copy the vertices array to a separate file, get rid of
{,},and the last}. - Open table processor, copy the data there, use data to columns function. You end up with the values in a table of 3 columns (A,B,C for x,y,z coordinates).
- Recompute edges. Use in column D:
=IF(A1=-52.5;"leftX", IF(A1=52.5;"rightX";"") ), similarily for the B column to recompute ±52.5 tofrontY,rearY(in column E). - Recompute diameter. In columns F and G:
=IF(ABS(A1)<50;A1/65&"* diameter";"") - Compose it back using
="{"& D1&F1 &","& E1&G1 &","& C1 &"},"(note: either one of D and F, resp. E and G columns are empty - Replace the original vertices in the function, don't forget to delete trailing comma and test.
- Do the same with UV coordinates. Use
=IF(A1=0;"leftX", IF(A1=1;"rightX";"") )instead (the UVs are normalized between 0 and 1) for edges. Use=IF(AND(A1>0;A1<1);A1/2&"* diameter";"")for the hole. - Add
="uOffset +"&C1and="vOffset +"&D1 - Compose back, clean things like
uOffset +- 0.(replace+-to-) or0 * diameter(change to 0) etc. - Test
We do not touch the triangles and the normals as well in this case. If you change the slope, you might need to recompute normals accordingly.
- The hole
- Take the hole mesh, apply the steps 1-6 like in the quad.
- Recompute diameter:
=A1/65&"* diameter"(you do not need the check for edge - it is not there) - Recompute height:
=IF(C1>0;"height",0) - Recompute the UVs. In this case, the hole is wrapped between 0 and 1, which must be recomputed to actual hole size: cell C1
=A1*PI() &"*diameter", cell D1=IF(A1>0,",height",",0") - Add
="uOffset +"&C1and="vOffset +"&D1 - Compose everything back.
You can check the result in 200_100_60_rescalablemesh.json and how it is being used in 200_100_60_rescalablemesh.json
Hints:
- Use
demoCatalogId:gridto tweak UVs. Every marked square is 100x100 units. - Plan how you're going to recompute the vertices and UVs when defining the meshes and their pivots. Separate everything as much as you can.
- Plan the mesh with more distinctive scaling. It would have been better to have it between -1000;-1000 and 1000;1000 with the diameter being 1 (so that you can do everything in VS Code already, saving some steps).
