# Meshes Conversion and Upload
This guide will not tell you how meshes are made, but rather how the meshes you already have can be converted and uploaded in order to be accessible by the Roomle Rubens Configurator.
Uploading of the meshes and the whole process is different than at Level 1 3D Viewer. Level 2 to 4 content creators have to follow the procedure described in this article.
# Converting a Single Mesh for Use in the Rubens Configurator
In the Rubens Admin catalogue Import/Export section, there is a field to upload a ZIP with meshes in the OBJ format. However, you need first to use the Roomle Blender Addon to pre-process the meshes. To do so, follow these further steps:
- Open Blender with an empty scene (delete the default Cube that's in the scene by default)
- Import your file with the mesh in the File > Import section.
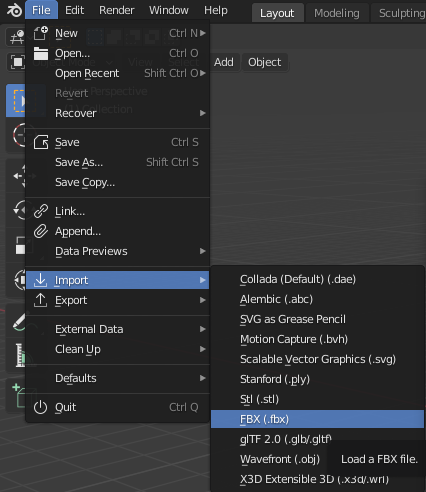
Note: You need to have the file in a format that is possible to import to Blender. If you do not have an appropriate importer, you either can add more file importers to Blender or you have to convert the mesh using a third party tool. - In the Outliner view, you should have now your imported objects, which can look like this:
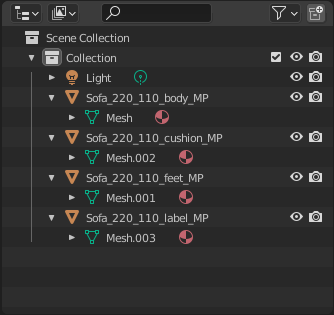
- The name of the mesh object is important, because this is what the final mesh ID will be. If this is implicit, you should rename it (in our example:
Mesh,Mesh.001, etc. which should be renamed).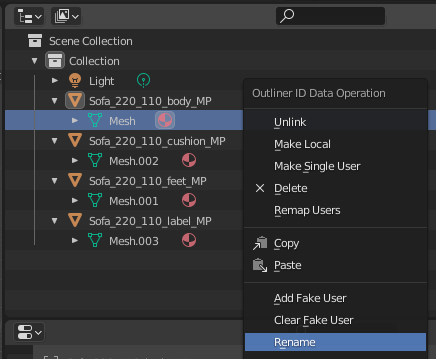
In our example, we're using the same mesh name as its parent object name.
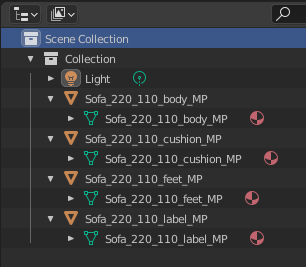
- Export the mesh with the Roomle Blender Addon using the File > Export > RoomleScript (.txt)
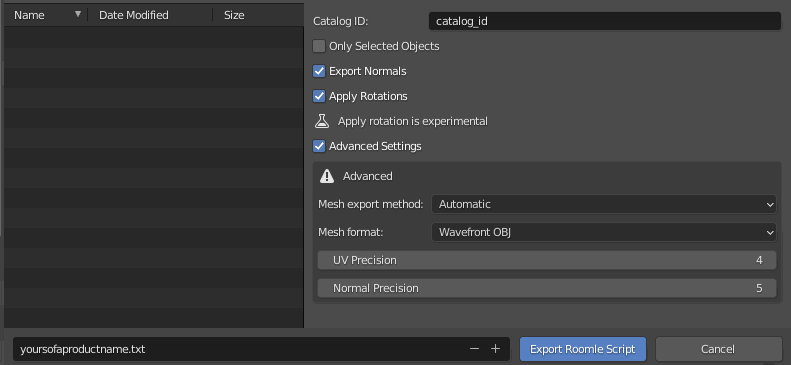
- Define the file name. This is important, as it will be part of the mesh IDs as a prefix separated with an underline.
- Fill in the catalog ID into which catalog you are going to import the meshes. If you do not know this at the moment, you can keep the default value for now.
- It is recommended in the Advanced Settings to swithc the Mesh export method option from Automatic to Force External.
- After you will have completed the export, you will have one folder and one text file. Compress the folder using the ZIP method and upload it to your catalog in its Import / Export section.
- Keep the TXT file. You will need it to link the meshes to your components (but if you loose it, there is a way to retrieve the data).
# Checking the TXT file
You can check the dimensions of the meshes in the TXT file. The second argument of the AddExternalMesh function is the size in milimeters. If the meshes size do not reflect reality, you should rescale the mesh in Blender. See following examples on how the data should look like:
wrong: Object is too small, you should scale 1000 times AddExternalMesh('isdt:chair6547_Corpus594SE1', Vector3f{0.820, 0.886, 0.838}, Vector3f{ -0.410, -0.455, 0.24});
correct: A chair size of just under 1 meter (820 x 886 x 838 mm) is legit AddExternalMesh('isdt:chair6547_Corpus594SE1', Vector3f{820, 886.4, 838.3}, Vector3f{ -410, -455.1, 240.2});
wrong: Object is too big, you should scale 0.001 times AddExternalMesh('isdt:chair6547_Corpus594SE1', Vector3f{820001, 886399, 838301}, Vector3f{ -410000, -455100, 240200});
# Pivot Convention and Coordinate System
A good pivot placement is recommended in order to be able to work with your meshes efficiently. In Level 2 material configurators, the pivot placement does not have a lot of influence, but it still is worth to place it in a good place for cases, where you're considering to promote to Level 3 or 4 in the future.
For standalone products, pivot should be placed at the center of its bottom place. Such products include chairs, tables, household machines.
For products that are intended or suitable to be placed at a wall, like sofas, cupboards etc., place the pivot in the center of the bottom rear edge.
Roomle Configurator has a left hand Z-up coordinate sytem (X+ to right, Y+ towards the camera, Z+ up). Following example is a good orientation as seen in Blender's coordinate system (the Y direction is inverted in Roomle).
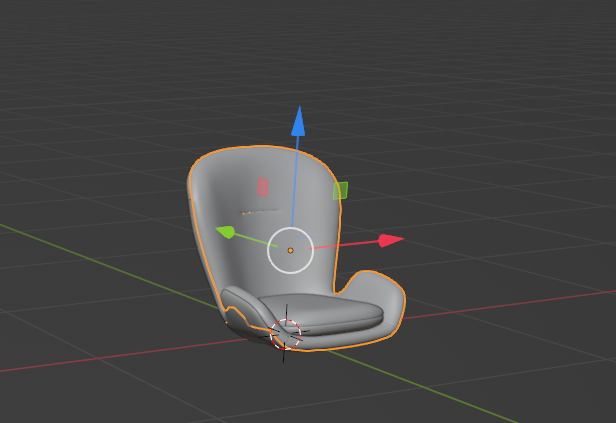
This is important as the default position of the camera in the configurator is in the way that it looks at the object from forward and slightly left (a point somewhere in {-x, +y, +z} in the Roomle configurator's coordinate system).
# UV mapping
There are two recommended ways to set up UV maps in the Roomle platform based on the context of the product. See the next chapter about materials to read about the details.
# Converting and Processing Multiple Meshes
In order to convert more meshes at once (for cases where you want to make more products in one step or where one product consists of different meshes), you can use following Blender Python snippets. To use them, open Blender, press Shift+F11 in order to go to the Scripting mode and press the New button to create a new script. Then build the script from following recipes:
Under MacOS, it is recommended to run Blender via the Terminal in order to get the console messages:
cd /Applications/Blender.app/Contents/MacOS
./Blender
# necessary imports:
import os
import bpy

# set path to the folder with your meshes
# MacOS:
meshes_folder_path = os.path.join('', '/Users/username/PATH')
# Windows:
# under windows, backslashes \ need to be escaped by replacing to \\ or changed to forward slashes
# meshes_folder_path = os.path.join('', 'C:/Users/user/Downloads')
# meshes_folder_path = os.path.join('', 'C:\\Users\\user\\Downloads')

# get a list of all files in the directory
all_files = sorted(os.listdir(meshes_folder_path))

# filter the files to only cerain suffix
filtered_files = [file_to_filter for file_to_filter in all_files if file_to_filter[-3:] == 'obj']

# import every filtered file, add to scene
for file_to_import in filtered_files:
    path_to_file = os.path.join(meshes_folder_path, file_to_import)
    bpy.ops.import_scene.obj(filepath = path_to_file)
NOTE: For other file formats than OBJ, change the suffix in the line where the files are filtered and the importer function from the
bpy.ops.import_sceneclass. For reference of those functions, see Blender documentation: Import Scene Operators (opens new window)
After running this snippet by hitting the "Play" icon in the top of the view, you should now have all the meshes from the folder imported in the scene. If the import ran well and complete, it is recommended that you save the scene as a .blend file, so that you do not need to import again if needed.
Warning: If you run import second time in the same Blender instance, all meshes will add suffixes to distinguish duplicate object names, even if you delete the objects. All meshes names will have .001, .002 etc. suffix. To prevent this, make one import of the same data per one new file.
You can already export the data. If you know or find out later that you need to make batch modifications, you can continue with further snippets. Just use only the functionalities you need:
# necessary imports:
import bpy

# make sure you have done the imports

# for each mesh in the scene loop
for ob in bpy.context.scene.objects:
    if ob.type == 'MESH':
        # re-scale 1000 times smaller (do not forget to apply transform in the end)
        ob.scale *= 0.001

        # rotate by 90 degrees around X-axis (do not forget to apply transform in the end)
        ob.rotation_euler = (radians(angle_deg),0,0)

        # replace in name
        ob.data.name = ob.name.replace("string to replace", "with")
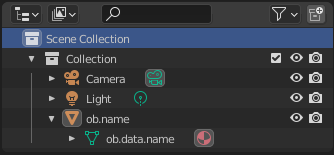
        # you need to distinguish between ob.name and ob.data.name, see example further

        # recalculate normals:
        bm = bmesh.new()
        bm.from_mesh(ob.data)
        bmesh.ops.recalc_face_normals(bm, faces=bm.faces)
        bm.to_mesh(ob.data)
        bm.free()
        ob.data.update()


        # apply transform:
        # this will bake the transform to the vertex coordinates directly -> you will not have a mesh + modifier functions, but mesh at origin with the positions applied to its vertices directly
        # this is a necessary step after scaling, moving or rotating the mesh
        ob.select_set(True)
        bpy.ops.object.transform_apply(location=True, rotation=True, scale=True)
        ob.select_set(False)
Difference between ob.name and ob.data.name:
